 When building strength and balance in the body I often talk about the importance of chiropractic adjustments, probiotics, filtered water, a clean wholesome diet, reducing toxins where ever possible, sharing bugs, getting dirty, sweaty exercise and quality sleep…
 When building strength and balance in the body I often talk about the importance of chiropractic adjustments, probiotics, filtered water, a clean wholesome diet, reducing toxins where ever possible, sharing bugs, getting dirty, sweaty exercise and quality sleep…
With all of this in mind there’s no doubt that at times the budget may be stretched so I’d love you to discover an additional inexpensive way to support your health and well-being by incorporating home-made probiotics into your week through fermenting food.
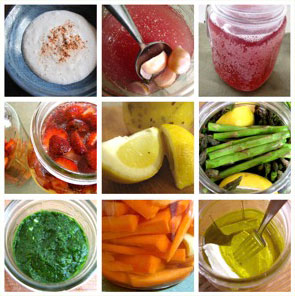
I get it – the thought of reverting back to an ancient preservation technique that encourages the breakdown of carbohydrates and proteins by bacteria, yeasts and molds may not initially float your boat but I ask you to reserve your judgement until you have had a look at the health benefits that fermented foods offer and UNTIL you try a recipe or two. At this point as you create homemade digestive super-foods such as kombucha, sauerkraut, yoghurt, preserved fruits and vegetables for your family you might then just find yourself feeling like an incredibly sophisticated ‘health guru’ 🙂 … That’s always incredibly satisfying and some of these foods are actually way more exciting then they sound!
But Why Would I Ferment My Food?
It’s important to explore new healthy habits and as we work through a series of posts on the gut-brain-axis we are going to look at a number of different lifestyle ideas that boost our innate health.
The digestive process has two distinct features:
- the breaking down of ingested foods — decomposition
- the building up of nutrients needed by the body — reconstruction
If the breaking down is incomplete, the building up cannot proceed correctly. In reality we nourish ourselves not by what we eat but by what we are capable of breaking down and transforming into nutrients the body can use.
The main by-product of this process of lacto-fermentation is lactic acid and what is astonishing is that lactic acid contributes to both processes—that of decomposition and that of reconstruction. On the one hand it supplies digestive juices in the form of organic acids that help break down the foods we eat, and on the other it activates the metabolic processes. It’s pure genius really.
Health Benefits of Fermenting Foods
Here’s just a few other reasons these foods are well worth the effort and wait.
1. Fermented foods restore the proper balance of bacteria in the gut.
If you experience bloating, flatulence, nausea, bad breath, vomiting and diarrhoea and/or constipation chances are you have dysbiosis or an imbalance of good to bad bacteria and recent research has revealed that dysbiosis is strongly linked with all chronic gastrointestinal, inflammatory and autoimmune diseases. It may also be very important in conditions such as fatigue, poor immunity, cancer and allergies.1
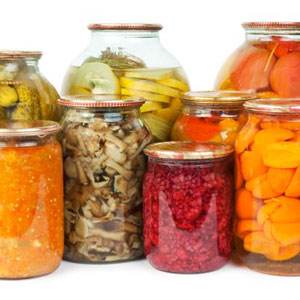
Traditionally fermented foods, or “functional foods,” are highly beneficial as they contain natural probiotics which promote the growth of friendly intestinal bacteria and have been shown to help with many health challenges.2 The lactic acid created not only keeps vegetables and fruits in a state of perfect preservation (inhibiting putrefying bacteria) but also promotes the growth of healthy flora throughout the intestine.
2. Raw, fermented foods are rich in enzymes.
Our body creates digestive enzymes for a multitude of functions, including the breakdown and digestion of food. These enzymes not only help to break down food but eliminate bad bacteria and microbes introduced to the digestive tract in doing so it is suggested that fermentation helps to regulate stomach acid and eases bowel movements helping with acidity issues and constipation.3 As we age digestive enzymes decrease so it’s a great idea for adults who may not identify with dysbiosis symptoms to incorporate fermented foods as a proactive healthy aging habit.
3. Fermented foods improve digestion.
When we ferment our foods they become partially digested by the friendly bacteria which sounds disgusting I know BUT it does make these foods easier for our body to breakdown. For example some people can’t tolerate milk but can eat yogurt because it is fermented dairy and the lactose is broken down through the souring process. Fermented foods are great to combine with meats and other foods that are hard to digest.
4. Natural Chelators — added bonus!!
One thing that many people do not realize is that fermented foods are some of the best chelators available. Chelators are molecules that bind to metal ions and in this scenario the beneficial bacteria created in fermented foods which are potent detoxifiers are capable of binding to metals that have been held within the body and draws them all the way through the digestive tract and out the body through our poo!!
5. Fermenting food increases the vitamin content of the food and helps us to absorb the nutrients we’re consuming.
With fermentation, foods are partially digested deepening our accessibility to the richness of vitamins and minerals that are available. Additionally the probiotic component of fermented foods increases our capacity to absorb nutrients and builds our digestive power.4
…Intrigued??
Well in the next post I’d like to share with you a host of recipes on how you can ferment foods at home. Let me be honest I did have to read my fermenting recipe books and the set of instructions a couple of times before embarking on the process but like anything, it becomes easy with practice.
Not Intrigued enough to don on an apron? “Can’t I just buy fermented foods?”
Yes absolutely you can find some high quality traditionally fermented varieties of foods at good health food stores and delis. There are BIG differences between genuinely authentic fermented foods and commercially fermented foods — such as fish preserved in brine (or anything in brine) and most yoghurts sold in supermarkets — so make sure you buy the good stuff.
How often should I eat fermented foods?
We don’t need to consume huge amounts. Most experts recommend eating about a quarter to a half a cup of fermented vegetables, or cultured food such as raw yoghurt, per day. Bear in mind that since cultured foods are very efficient detoxifiers, you may experience detox symptoms, or a “healing crisis,” if you introduce too many at once.
My favourite way to indulge in fermented foods is via Kombucha, a fermented drink. It’s a refreshing spin on homemade lemonade (my children will tell you that’s a lie but I love it and they are now use to it — my rule is: it’s a swig every day in our household).
The key though really is “variety”: The greater the variety of fermented and cultured foods you include in your diet, the better, as each food will inoculate your gut with a variety of different microorganisms.
15 Fabulous Fermented Food Recipes!
Now I want to share with you some recipes for fermenting foods. Obviously there are hundreds of recipes available and loads of variations so I encourage you to purchase cookbooks solely dedicated to fermenting foods and really throw yourself into this…
 Now I want to share with you some recipes for fermenting foods. Obviously there are hundreds of recipes available and loads of variations so I encourage you to purchase cookbooks solely dedicated to fermenting foods and really throw yourself into this…
For those of you who have no idea why we’re excited about fermenting foods please see my previous post Why the Heck Would I Ferment Foods? and consider this inexpensive way to boost your intake of highly beneficial probiotics.
The recipes presented here are designed to be made in small quantities in your own kitchen. They do not require any special equipment apart from a collection of mason jars and a wooden pounder or a meat hammer.
…But before we jump in, make sure you read “Top 10 Tips For Fermenting Foods”
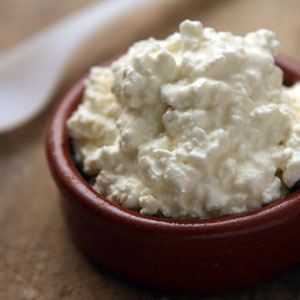
WHEY & COTTAGE CHEESE
Please use whole organic milk, raw organic milk (bath milk), whole-milk buttermilk or organic full fat plain yoghurt or kefir. You can also use goat’s milk products but the less processed the better is the main factor here to consider with your ingredients. With the following recipes that require whey, it doesn’t matter if you are using a cow’s milk whey, kefir whey or goats milk whey. To make Kefir please see recipe in our “5 Fabulous Fermented Drink Recipes” post.
You can use whatever sized quantity of milk or yoghurt that you desire.
Whey is used in many of these recipes – as a starter culture for lacto-fermented vegetables and fruits, for soaking grains and as a starter for many beverages.
Whey is the liquid remaining after milk has been curdled and strained, and is the starter for lacto-fermented fruits, vegetables, and beverages. This recipe will also make cottage cheese.
Prep Time – 10minutes
You Will Need:
- 2 litres of whole organic milk, raw organic bath milk, organic full fat yoghurt or kefir
- Sieve or strainer
- Large Bowl
- New, clean dish towel (tea-towel)
- Wooden spoon
- 500ml wide-mouth Mason jar with a tight fitting lid
- Glass jar for your cottage cheese
Method:
- Take 2 litres of milk or 1.5L’s of yoghurt and let it stand at room temperature for 1-2 days until the milk visibly separates into white curds and yellowish whey. If you are using yoghurt, no advance preparation is required. If you are using raw milk, place the milk in a clean glass container and allow it to stand at room temperature 1-4 days until it separates.
- Line a large strainer set over a bowl with a clean dish towel.
- Pour in the yoghurt or separated milk, cover and let stand at room temperature for several hours (longer for yoghurt). The whey will run into the bowl and the milk solids will stay in the strainer.
- Tie up the towel with the milk solids inside, being careful not to squeeze.
- Tie this little sack to a wooden spoon placed across the top of a container so that more whey can drip out.
- When the bag stops dripping, the cheese is ready. Store whey in a mason jar and cream cheese in a covered glass container.
- Refrigerate, the cream cheese keeps for about 1 month and the whey for about 6 months.
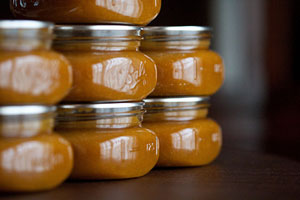
BERRY PRESERVES
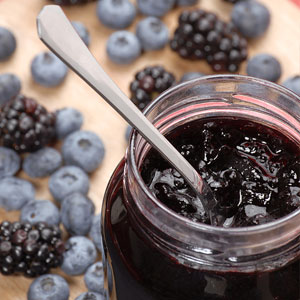 BERRY PRESERVES
Berry preserves and syrups (see below) are one of my favourite fermented foods. They are so easy and you can use them on so many things such as breakfasts, desserts, smoothies. Almost everyone loves berries and it is a great way to a dose of probiotic foods. You may use any summer berry except strawberries, which are too acidic for lacto-fermentation purposes.
Prep Time – 10minutes
Total time – 4 days to 4 weeks
You Will Need
- 4 cups fresh berries, such as boysenberries, blackberries or raspberries, or a mixture
- 2 teaspoons sea salt
- ¼ cup Rapadura or honey
- ¼ cup whey (see recipe above)
- 2 teaspoons Pectin (available at supermarkets and health food stores)
- 2-3 tablespoons of filtered water (or 2 teaspoons of calcium water if included in your pectin)
- Large mixing bowl
- Wooden pounder or a meat hammer
- 2 x 500ml wide-mouth mason jar with a tight fitting lid
- Tea towel
Variation: Berry Syrup
Omit pectin and calcium water.
Place berries in a quart-sized, wide mouth mason jar and press down lightly. Mix remaining ingredients and pour into jar. Add enough filtered water to bring level of the liquid to the top of the berries. Proceed with recipe. This is delicious on vanilla ice cream or pancakes.
Method:
- Wash berries and place in a bowl with remaining ingredients.
- Carefully mash down with a wooden pounder or a meat hammer until berries are well crushed.
- Mix thoroughly and place in a quart-sized, wide-mouth mason jar. The top of the preserves should be at least 1 inch below the top of the jar. Screw lids on firmly. Set on a tray or plate in case juices bubble out of the lid (this happens and can make a mess). Close lid tightly and cover tightly with a tea towel.
- Leave at room temperature for 24-48 hours. In a very warm kitchen during summertime the berries might ferment in 12 hours so just check them. Mine generally take 48 hours to ferment in a 20 degree Celsius kitchen (70 degrees Fahrenheit). Do not leave for more than 48 hours as, due to the high sugar content of fruit, it will become alcoholic.
- Transfer to the refrigerator and use within 2 months.
APRICOT BUTTER
This apricot butter is fantastic with porridges, pancakes and with many baked puddings and desserts. It’s delicious. In summer time when apricots are abundant I use my dehydrator and use the apricots this way – oh it’s so good!
 Prep Time – 10minutes
Total time – 4 days to 4 weeks
You Will Need
- 4 cups organic or unsulphured dried apricots
- 1 tablespoon sea salt
- ¼ cup whey (see recipe)
- ¼-1/2 cup raw honey
- Small saucepan
- Slotted spoon
- Food Processor
- Tea towel
- 2 x 500ml wide-mouth mason jar with a tight fitting lid
Variation: Apple Butter
Use dried apples instead of apricots – if you have a dehydrator then make your own as the flavour is much deeper and gratifying.
Variation: Pear Butter
Use dried pears instead of apricots.
Method:
- Cook apricots in filtered water until soft.
- Let cool slightly and transfer with a slotted spoon to food processor. Process with remaining ingredients.
- Taste for sweetness and add more honey if necessary.
- Place in quart-sized, wide-mouth mason jars. Cover tightly and keep at room temperature for about 2 days before transferring to refrigerator.
- Close lid tightly.
- Cover tightly with a tea towel and keep at room temperature for about 2 days before transferring to refrigerator.
This butter should be eaten within 2 months.
FERMENTED SWEET POTATO

You can warm this mixture gently and eat it straight away as a mash or place in an airtight container and store in the refrigerator. From here it can be used as a spread on sandwiches or toast or crackers like cream cheese. It also makes an excellent baby food.
Makes about 3 cups
Prep Time – 10minutes
You Will Need:
- 900 grams organic sweet potato
- 1 tablespoon sea salt
- 4 tablespoons whey (see recipe)
- Peeler
- Large bowl
- 500ml wide-mouth mason jar with a tight fitting lid
Method:
- Leave the skin on and poke a few holes in the sweet potato
- Bake in an oven at 150 degrees Celsius or 300 degrees Fahrenheit for about 2 hours or until soft.
- Peel and place in a bowl, mash with salt and whey.
- Cover and leave at room temperature for 24 hours.
FERMENTED BEAN PASTE
 FERMENTED BEAN PASTE
Prep Time – 10minutes
Total time – 4 days to 4 weeks
You Will Need:
- 3 cups basic beans cooked and drained (kidney or lima beans work well or a combination of both)
- 1 onion, peeled and coarsely chopped
- 3 cloves garlic, peeled
- 1 tablespoon sea salt
- 4 tablespoons whey (please see recipe)
- 500ml wide-mouth mason jar with a tight fitting lid
- Food processor
Method:
- Place onion and garlic in food processor and process until well chopped.
- Add remaining ingredients and process until smooth.
- Place in a 500ml wide-mouth mason jar, leaving 1 inch of space between the top of the beans and the top of the jar.
- Close tightly and cover tightly with a tea towel and leave at room temperature for about 3 days before transferring to the refrigerator. Serve as a dip with corn chips or tortillas.
CARROT STICKS
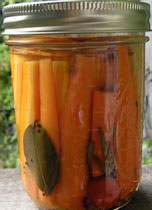 Note: Using a narrow-mouth mason jar is helpful for a ferment like this because it helps to keep the carrot sticks submerged. A wide-mouth jar also works, but isn’t quite as helpful in this regard.
Prep Time – 10minutes
Total time – 4 days to 4 weeks
You will need
- 1 – 1 1/2 pounds of fresh carrots, trimmed and cut into quarters lengthwise
- 3 garlic cloves, peeled
- 2 bay leaves (optional)
- 2 cups of water, or more as needed
- 2 tablespoons of sea salt
- One large outer cabbage leaf
- 500ml narrow-mouth mason jar with a tight fitting lid
Method
- No whey is required for this recipe. Make brine by dissolving the sea salt in water. If your water is cool you may have to heat part of the water in order to dissolve the salt. Then stir in the cool water and let brine cool to room temperature before using.
- Place peeled garlic cloves and bay leaves in the bottom of a mason jar. Cut carrots into quarters lengthwise to the height of the narrowing of the narrow-mouthed jar. If using a wide-mouth jar, cut them so that they are about 1–1.5 inches below the bottom of the ring of the jar.
- Place carrot sticks vertically in jar on top of the garlic cloves. Pack them in so they are snug, but not over-packed so that the brine can still penetrate the carrots.
- Pour the 2 cups of brine over the carrot sticks so that they are completely covered by as much brine as possible, leaving a 1 inch or so headspace between the brine and the lip of the jar. Add more water, if needed.
- Place the hefty outer cabbage leaf over the carrot sticks and tuck it in to the sides this helps to keep the carrots submerged.
- Place the lid on the jar and close tightly. Cover tightly with a tea towel.
- Check every few days as per “Tips”. Leave it at room temperature for a few days and then move to a cooler temperature to complete the fermentation process over the course of several weeks for better flavor and a more thorough fermentation process.
PICKLED CUCUMBERS
 PICKLED CUCUMBERS
Lacto-fermented cucumbers and cornichons (small cucumbers) are very refreshing and far less acid than pickles conserved in vinegar – one never grows tired of them.
Prep Time – 10minutes
Total time – 4 days to 4 weeks
You Will Need:
- 4-5 pickling cucumbers or 15-20 gherkins
- 1 tablespoon mustard seeds
- 2 tablespoons fresh dill, snipped
- 1 tablespoon sea salt
- 4 tablespoons whey (see recipe above) (if not available, use an additional 1 tablespoon salt)
- 1 cup filtered water
- 500ml wide-mouth mason jar with a tight fitting lid
- Tea towel
Method:
- Wash cucumbers well and place in a quart-sized, wide-mouthed mason jar.
- Combine remaining ingredients and pour over cucumbers. No whey is required for this recipe.
- The top of the liquid should be at least 1 inch below the top of the jar.
- Close tightly and cover tightly with a tea towel and keep at room temperature for about 3 days before transferring to cold storage.
SAUERKRAUT
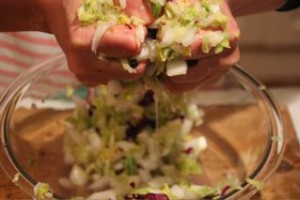
Sauerkraut is a wonderful healing remedy for the digestive tract full of digestive enzymes, probiotic bacteria, vitamins and minerals. Eating it with meats helps to improve digestion as it has a strong ability to stimulate stomach acid production. For people with low stomach acidity I recommended having a few tablespoons of sauerkraut (or juice from it) 10-15 minutes before meals. For children, initially add 1-3 tablespoons of the juice from the sauerkraut into their meals. You do not need to add any starter to the sauerkraut, as fresh cabbage has natural bacteria living on it, which will do the fermentation for you.
Prep Time – 10minutes
Total time – 4 days to 4 weeks
You Will Need:
- 1 medium cabbage, cored and shredded (or half a red cabbage and half a green cabbage) roughly 900 grams
- 2 carrots (optional)
- 1 tablespoon caraway seeds (optional)
- 1-2 tablespoons sea salt (or teaspoons of salt per 450 grams of cabbage)
- 1 glass jar with a tight fitting lid or a bowl and a plate (that fits just inside the bowl as a form of lid) Ideally a jar that holds 950ml because you will need a 475mls of jar capacity per 450grams of cabbage
- Large chopping board
- Large knife
- Large mixing bowl
- Food Processor (optional)
- Tea towel
- No whey is required for this recipe.
METHOD
- Clean your hands
- Peel off outer leaves of cabbage and discard. Slice your cabbage very thinly. Do not use the core of the cabbage. Simply discard the core. You can use a food processor using a ‘slice’ wheel to shred your cabbage.
- Add two carrots to your foods processor or grate the carrots directly into your mixing bowl to capture any carrot juice.
- Place all ingredients into your mixing bowl.
- Add 1-2 tablespoons of salt.
- Knead the mixture well with your hands until a lot of the juice comes out. This may take some time. If the cabbage is not juicy enough add a little water. Add the caraway seeds.
- Pack this mixture into a suitable glass jar or bowl, pressing it firmly so there is no air trapped and the cabbage is drowned in its own juice.
- Now seal the glass jar with its lid and cover with a tea towel to shield it from the light. Alternatively if you are using a bowl place a plate on top of the cabbage, which is about 1cm smaller in diameter than the bowl. The gap will allow the fermentation gasses to escape. On top of the plate place something heavy enough to keep the cabbage constantly submerged in its juice. Cover the whole thing with kitchen towel to keep it in the dark.
- Check on your sauerkraut every day or two (this burps the jar as well). Open the jar, smell it, taste it with a clean fork and push the sauerkraut back down into its juices. After a few days it should go bubbly and after another few days it should start to smell and taste sour.
Sauerkraut is delicious with any meal and it can be added to your homemade soups and stews.
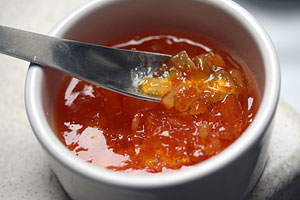
ORANGE MARMALADE
Variation: Kumquat Marmalade
Use about 2 dozen kumquats instead of oranges.
This makes a lovely delicious, thick marmalade which is terrific to use with breakfasts or when cooking savouries, desserts or creating gravies or sauces.
Prep Time – 10minutes
Total time – 3-4 days to 4 weeks
You Will Need
- 3-4 organic oranges
- 1 tablespoon sea salt
- ¼ cup whey (see recipe)
- ½ cup filtered water
- ¼ cup Rapadura
- Large chopping board
- Large knife
- Large mixing bowl
- Tea towel
- Wide-mouth mason jar
Method:
- Slice oranges into very thin round circles and then cut these slices into quarters.
- Place into a wide-mouth mason jar and press down lightly with a wooden pounder or a meat hammer.
- Combine remaining ingredients and pour over oranges. Adding more water if necessary to cover them.
- Marmalade should be at least 1 inch below the top of the jar. Close tightly and cover with tea towel and keep at room temperature for about 3 days before transferring to cold storage. If marmalade develops spots of white mold on the top, simply remove them with a spoon.
- This marmalade should be eaten within 2 months.
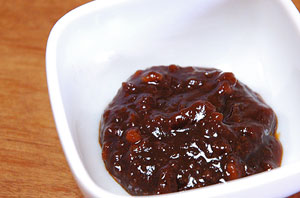
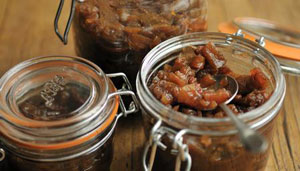
RAISIN CHUTNEY
 RAISIN CHUTNEY
Prep Time – 10minutes
Total time – 4 days to 4 weeks
You Will Need
- 3 cups raisins, soaked in warm water for 1 hour
- 4 cloves garlic, peeled and coarsely chopped
- 1 bunch coriander (cilantro), stems removed
- 20 black peppercorns
- ½ teaspoon red pepper flakes
- 2 tablespoons coriander seeds
- 1 tablespoon cumin seeds
- 1 tablespoon anise seeds
- 1 tablespoon freshly grated ginger
- 2 teaspoons sea salt
- ¼ cup whey (see recipe)
- 1 cup filtered water
- Large mixing bowl
- Tea towel
- Wide-mouth mason jar
- Food processor
Method
- Place garlic and cilantro in food processor and pulse a few times.
- Drain raisins and add to food processor along with peppercorns, red pepper flakes, seeds and ginger. Pulse a few times until the mixture becomes a coarse paste.
- Transfer to a quart-sized, wide-mouth mason jar and press down lightly with a wooden pounder or a meat hammer.
- Mix salt and whey with water and pour into jar. You may need to poke a few holes in the chutney to allow liquid to percolate through.
- Add more water if necessary to cover the chutney.
- The top of the chutney should be at least 1 inch below the top of the jar. Close lid tightly, cover with tea towel and keep at room temperature for about 2 days before transferring to refrigerator.
- The chutney should be eaten within 2 months.
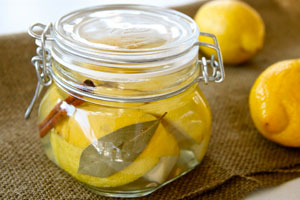
PRESERVED LEMON
 PRESERVED LEMON
Prep Time – 10minutes
Total time – 4 days to 4 weeks
You Will Need
- 5 organic lemons, preferably thin-skinned variety
- 3 tablespoons sea salt
- 3 cinnamon sticks
- 3 bay leaves (optional)
- 2 tablespoons whey (see recipe above)
- Juice of 2 lemons
- Large chopping board
- Large knife
- Large mixing bowl
- Tea towel
- Wide-mouth mason jar
Method:
- Wash lemons well, slice thinly and cut slices into quarters.
- Toss in a bowl with salt, cinnamon sticks and bay leaves.
- Place in a quart-sized, wide-mouth mason jar and press down lightly with a wooden pounder or a meat hammer.
- Mix lemon juice with the whey and add to jar, pressing down so that the liquid completely covers the lemons.
- Lemons should be at least 1 inch below the top of the jar.
- Close lid tightly,cover with tea towel and keep at room temperature for up to 2 weeks, turning jar once a day, before transferring to cold storage. When adding to recipes remove pulp and cut skin into a julienne.
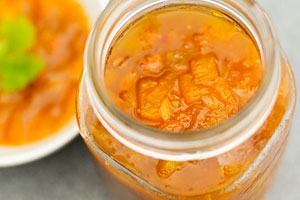
MANGO CHUTNEY
 MANGO CHUTNEY
Prep Time – 10minutes
Total time – 4 days to 4 weeks
You Will Need
- 3 cups of firm mango, peeled and cubed
- 1 tablespoon grated ginger
- 1 red pepper, diced
- 1 cup coriander (cilantro), chopped
- 1/4 cup lime juice
- 2 teaspoons sea salt
- 1/4 cup whey
- 1/2 cup filtered water
- Large chopping board
- Large knife
- Large mixing bowl
- Tea towel
- Wide-mouth mason jar
Method:
- Mix all ingredients (including water) in large bowl, then pour into a wide-mouth mason jar. Fill the jar two thirds full.
- Press down.
- The fruit should be covered in liquid, if it is not add more water. Leave 1 inch a top.
- Close lid tightly, cover with a tea towel and sit at room temperature for 3 days before transferring to refrigerator. We’ve used this as a condiment with Mexican dishes, yum!!!
VEGETABLE MEDLEY
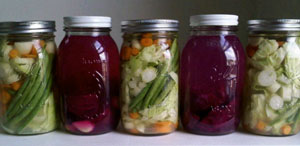 VEGETABLE MEDLEY
Prep Time – 10minutes
Total time – 4 days to 4 weeks
You Will Need:
- 1 medium cabbage, cored and shredded (or half a red cabbage and half a green cabbage) roughly 900 grams
- 1 beetroot (peeled)
- 2 carrots
- 1/2 head of cauliflower
- 1/2 head broccoli
- 3 medium sized cloves of garlic
- 1/4 cup whey
- 1/2 cup filtered water
- 2 teaspoons sea salt
- Large chopping board
- Large knife
- Large mixing bowl
- Tea towel
- Wide-mouth 1 litre mason jar or 2 x 500ml jars
Method:
- Slice the cabbage (white, red or any other variety), beetroot, garlic, cauliflower, broccoli and carrots into nice bite-size pieces roughly.
- Mix them all in a large bowl.
- Add some salt, whey and water.
- Pack into a one litre glass jar. Add this water to the jar until it completely covers the vegetables.
- Don’t forget to leave at least 2 ½ cm of space inn the jar at the top, as the vegetables will expand during fermentation.
- Close lid tightly and cover with tea towel and leave to ferment at room temperature for a week.
FERMENTED FISH
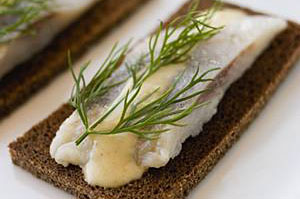 FERMENTED FISH
One of the best ways to eat cold water oily fish…
Prep Time – 10minutes
Total time – 4 days to 4 weeks
You Will Need
- 3-4 very fresh large herrings or mackerel (you can use other fish but these two are fairly sturdy)
- 1 small white onion
- 1-2 tablespoons of peppercorns
- 5-7 bay leaves
- 1 teaspoon of coriander seeds
- Fresh dill or some dill seeds
- 1 cup of whey
- Large knife
- Large mixing bowl
- Tea towel
- Wide-mouth 1 litre mason jar
Method:
- Skin the fish and remove large bones, cut into bite-size pieces.
- Peel and slice the onion.
- Put the pieces of the fish into the glass jar mixing with peppercorns, slices of white onion (optional), coriander seeds, bay leaves and dill seeds or dill herb.
- In a separate jug dissolve 1 tablespoon of sea salt in some water and add half a cup of whey. Pour this brine into the jar until the fish is completely covered. If the fish is not covered just add more water.
- Close the jar tightly, cover with a tea towel and leave to ferment for 3-5 days at room temperature, then store in the fridge. Serve with vegetables, fresh dill, spring onions and some mayonnaise. Consume within 1-3 weeks.
FERMENTED SARDINES
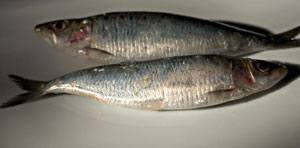 FERMENTED SARDINES
Prep Time – 10minutes
Total time – 4 days to 4 weeks
You Will Need
- 5-7 very fresh sardines
- 1-2 tablespoons of salt
- 1 tablespoon of peppercorns
- 5-7 bay leaves
- 1 teaspoon of coriander seeds
- Fresh dill or some dill seeds
- 1 cup of whey
- Large knife
- Large mixing bowl
- Tea towel
- Wide-mouth 1 litre mason jar
Method:
- Descale the fish, cut the heads off and clean the belly out.
- Place them into the glass jar. Add all the other ingredients.
- Top up with water so the fish is completely covered,
- Close the lid tightly, cover with a teatowel and let it ferment for 3-5 days at room temperature. When the fish is ready take the meat off the bones, cut into bite-size pieces and serve with fresh dill and a wicked green salad.
. . . . .
Yours in health…
Jennifer Barham-Floreani
Bach. Chiropractic, Bach. App Clinical Science
Registered internationally, no longer practicing as a chiropractor in Australia.
. . . . .
References:
2) Cross ML. Microbes versus microbes: Immune signals generated by probiotic lactobacilli and their role in protection against microbial pathogens. FEMS Immunology and Medical Microbiology 2002;34:245-253.
Gill HS, Rutherfurd KJ, Prasad J, Gopal PH. Enhancement of natural and acquired immunity by Lactobacillus rhamnosus HN001, Lactobacillus acidophilus HN017 and Bifidobacterium lactis HN019. Br J Nutr 2000:83;167-176
Gill HS, Rutherfurd KJ, Cross ML. Dietary Probiotic Supplementation Enhances Natural Killer Cell Activity in the Elderly: An Investigation of Age-Related Immunological Changes. Jour Clin Immunol 2001:21(4);264-271
3) Williams, D. 2013. Traditional Fermented Foods: The Digestive Health Benefits, 17 January. Available from: <www.drdavidwilliams.com/traditional-fermented-foods-benefits/>. [22 November 2013] 4) Vitamin Profiles of Kefirs Made from Milk of Different Species. International Journal of Food Science & Technology. 1991. Kneifel et al]”
