 Now I want to share with you some recipes for fermented drinks…
 Now I want to share with you some recipes for fermented drinks…
For those of you who have no idea why we’re excited about fermented foods and drinks please see my previous post Why the Heck Would I Ferment Foods? and consider this inexpensive way to boost your intake of highly beneficial probiotics.
…But before we jump in, make sure you also read “Top 10 Tips For Fermenting Foods”
Kefir
If using the powder, kefir is ready when it thickens, usually within 24 hours.If using grains, stir vigorously occasionally to redistribute the grains. Every time you stir, taste the kefir. When it achieves a tartness to your liking, the kefir is ready. The kefir may also become thick and effervescent, depending on the temperature, incubation time and the amount of curds you use.
Check the kefir after 24 hours. It should be thickened and starting to separate into curds and whey. If you don’t think it’s done, leave it out for another 12 to 24 hours until it appears finished
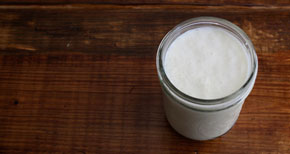
Kefir is a cultured milk beverage that has a wonderful tart flavour. It’s similar to yogurt but the taste is a bit different and it’s more of a drink than something you’d eat out of a bowl. Unlike yogurt, kefir contains beneficial yeast as well as good bacteria. If you can tolerate dairy, kefir is a great probiotic food to incorporate into your diet.
Prep Time – 10minutes
Total time – 4 days to 4 weeks
Makes 2 cups
You Will Need
- 2 cups fresh whole milk, nonhomogenized and preferably raw
- ½ cup good quality cream (optional)
- 1 tablespoon kefir grains or 1 package kefir powder
Method:
- If using kefir grains, place them in a fine strainer and rinse with filtered water.
- Place milk and optional cream in a clean wide-mouth mason jar. If milk is cold, place jar in a pan of simmering water until milk reaches room temperature.
- Add kefir grains or powder to milk, stir well and cover loosely with cloth.
- Place in a warm place (20-25°C / 65-76°F) for 12 hours to 2 days.
- Pour the kefir through a strainer into another jar to remove the grains.
- Store in refrigerator.
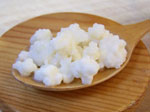 Use the grains to make another batch of kefir, or prepare them for storage by rinsing them well with water and placing them in a small jar with about ½ cup filtered water. They may be stored in the refrigerator for several weeks or in the freezer for several months. If they are left too long in storage, they will lose their culturing power.
Updated Recipe for Kombucha*
My girlfriend Therese Kerrr got me until Kombucha a few months ago. Interestingly, she refers to the growing scoby’s like they are all her children, I have more then enough children so I reserve any verbal affections but I do find the whole process of freaky looking scoby’s multiplying “fascinating”.
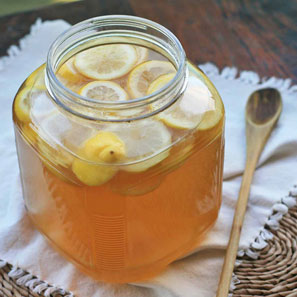
 Kombucha is a lightly effervescent fermented drink of sweetened black tea that is used as a functional food. It is produced by fermenting the tea using a symbiotic colony of bacteria and yeast, or “SCOBY”. In essence it’s bacteria rich sweetened tea. The bonus is that Kombucha is incredibly good for our liver, it helps it detox and the Scoby creates the same acids that the liver does to neutralise toxins. When the liver is burdened, overloaded and tired it fails to create these acids and the body can’t cleanse itself effectively, so the immune system is weakened.
Prep Time – 2 hours
Total time – 4 days to 4 weeks
You Will Need
- 7 organic black tea bags (you can use Green tea if you prefer)
- 1 cup of honey (or sugar)
- 14 cups filtered water (must be filtered otherwise the ferment is not likely to work)
- Container of vinegar for washing hands enabling you to handle the scoby
- 1 mother SCOBY (which you’ll have to get from a friend, online or follow the recipe below)
- 2 cups starter tea from last batch of kombucha or store-bought (unpasteurized, neutral-flavored) kombucha (an original starter batch can be made without this)
- 8 lemons (to boil with an additional 10 cups of water)
- 1/2 cup of grated ginger (more if you prefer)
- Other fresh herbs or spices
- Large pot or sauce pan
- One 4 litre glass container
- Bottles: Six swing-top bottles, or clean soda bottles
Method:
To make the Tea base:
Bring the 14 cups of water to a boil. Add tea bags and remove from heat. Add the honey and stir to dissolve. Let it cool over a few hours or steep overnight. Never add your mushroom to the hot tea as heat kills the SCOBY.
Once the tea has cooled:
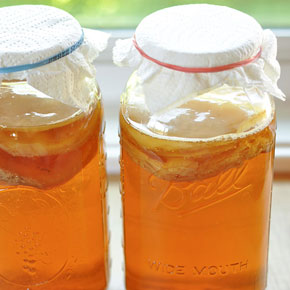
Remove the tea bags.Pour the tea mixture into a 4 litre sized glass container.Wash your hands with water then again with vinegar and place the SCOBY into the vessel. (It may float, it may sink — both are normal). Cover with a cloth (not a lid) or paper towels secured with a rubber band to prevent debris and fruit flies from getting in.
Ferment:
Once covered and sealed, cover the whole container with a towel or tea towel. Place in a dark, warm place for 7 days.
Remove the Scoby:
After the 7 days wash your hands with water, then wash them again with vinegar and check to see if a new Kombucha mushroom has formed. Another new SCOBY should have grown.
If it has, take out the SCOBY mother and its baby and place them in a clean glass dish. This leaves you with your kombucha liquid or tea. Cover the Kombucha mushrooms with the tea (ensure there is enough liquid covering both). Put the SCOBY in the fridge, or remake your batch immediately or give one scoby to a friend.
Take out your starter tea batch and reserve it in the fridge:
Measure out your starter tea from this batch of kombucha and set it aside for the next batch.
Create your additional flavours:
In a saucepan boil up 8 lemons (cut in half) and half a cup of grated ginger with 10 cups of water. Allow this to simmer for 30 minutes. Squeeze the juice from the cooked lemons with a pair of tongs into the water of the pan. Remove the lemon skins and allow the liquid to cool. Once cool add this liquid to your fermented liquid container and stir.
Strain:
Now strain the entire liquid from the jar with a funnel into sealable glass drinking bottles and close the lids so that they are air tight. The drink will be a little fizzy.
You can add some further grated ginger or more fresh lemon at this point to the Kombucha if you prefer a stronger taste. Or any type of fruit that you desire.
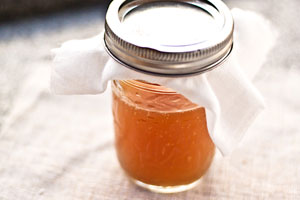
Store:
Store the bottled kombucha at room-temperature out of direct sunlight and allow 1 to 3 days for the kombucha to carbonate. Refrigerate and then consume your kombucha within a month.
Remake:
Make a Fresh Batch of Kombucha: Clean the jar being used for kombucha fermentation. Combine the starter tea from your last batch of kombucha with the fresh batch of sugary tea, and pour it into the fermentation jar. Slide the scoby on top, cover, and ferment for 7 to 10 days.
Drink:
Drink approximately ½–1 cup (half cup for children) of Kombucha drink a day to provide your stomach with incredible enzymes.
Remember to make batches in advance as it will take 7-10 days for every batch to go through the required process. I
Additional Notes:
• Batch Size: To increase or decrease the amount of kombucha you make, maintain the basic ratio of 1 cup of sugar, 8 bags of tea, and 2 cups starter tea per gallon batch. One scoby will ferment any size batch, though larger batches may take longer.
• Putting Kombucha on Pause: Store the scoby in a fresh batch of the tea base with starter tea in the fridge. Change out the tea for a fresh batch every 4 to 6 weeks.
• Other Tea Options: Black tea tends to be the easiest and most reliable for the scoby to ferment into kombucha, but once your scoby is going strong, you can try branching out into other kinds. Green tea, white tea, oolong tea, or a even mix of these make especially good kombucha. Herbal teas are ok, but be sure to use at least a few bags of black tea in the mix to make sure the scoby is getting all the nutrients it needs. Avoid any teas that contain oils, like earl grey or flavored teas.
• It is normal for the scoby to float on the top, bottom, or sideways in the jar. It is also normal for brown strings to form below the scoby or to collect on the bottom. If your scoby develops a hole, bumps, dried patches, darker brown patches, or clear jelly-like patches, it is still fine to use. Usually these are all indicative of changes in the environment of your kitchen and not a problem with the scoby itself.
• Kombucha will start off with a neutral aroma and then smell progressively more vinegary as brewing progresses. If it starts to smell cheesy, rotten, or otherwise unpleasant, this is a sign that something has gone wrong. If you see no signs of mold on the scoby, discard the liquid and begin again with fresh tea. If you do see signs of mold on the scoby, discard both the scoby and the liquid and begin again with new ingredients.
• A scoby will last a very long time, but it’s not indestructible. If the scoby becomes black, that is a sign that it has passed its lifespan. If it develops green or black mold, it is has become infected. In both of these cases, throw away the scoby and begin again.
• To prolong the life and maintain the health of your scoby, stick to the ratio of sugar, tea, starter tea, and water outlined in the recipe. You should also peel off the bottom (oldest) layer every few batches. This can be discarded, composted, used to start a new batch of kombucha, or given to a friend to start their own.
• If you’re ever in doubt about whether there is a problem with your scoby, just continue brewing batches but discard the kombucha they make. If there’s a problem, it will get worse over time and become very apparent. If it’s just a natural aspect of the scoby, then it will stay consistent from batch to batch and the kombucha is fine for drinking.
Make Your Own Mother Scoby!!
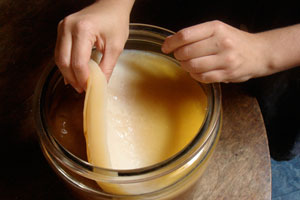
You can be “gifted” a Kombucha mushroom (Scoby) from a friend or you can make your own Scoby from scratch with this recipe. SCOBY means (Symbiotic Colony of Bacteria and Yeast) and yes it does take several weeks to breed the mushroom but there is something very gratifying about being the “go to source” for “mother” scoby’s and watching these babies grow time and time again.
You Will Need:
- 1 large glass clip down jar which will hold roughly 12 cups of filtered water or 3-4 litres.
- 1 cup of raw unpasteurized Kombucha tea (can purchase from good health food stores or online)
- 12 cups of filtered water (it won’t work with unfiltered water because of the fluoride)
- 1/2 cup of raw honey
- 15 black teabags you can use green tea bags
- Container of vinegar for washing hands so you can handle the scoby
- 1 flat glass container with lid for storing the Kombucha “Mother” mushroom in the fridge.
Method:
- In the large glass container (never use plastic, crystal or metal when making Kombucha), add the water and the tea and leave it resting for 24 hours.
- After tea has rested for 24 hours. Remove the tea bags, add the honey and the cup of raw unpasteurized Kombucha.
- Mix it well until the honey has been liquified.
- Cover the glass container with any cloth (I use an elastic band and a tea towel) and place the Kombucha in a dark and warm place for 4 or 5 weeks until the “Mother” mushroom has been created.
- At this point you can check on your breeding scheme and the “Mother” will look like a white jelly disc floating on top of the liquid.
- Wash hands thoroughly and then rinse with white vinegar.
- Place the “Mother” Kombucha in a flat glass tray (note: the tray can have a plastic lid, but don’t allow the plastic to come in contact with the Kombucha mushroom).
- Pour one large glass of the mixture over the top of the Kombucha mushroom (ensuring the mushroom is completely covered) and place the container in the refrigerator. Discard the balance of the liquid (do not drink). The Kombucha “Mother” is to be covered in Kombucha at all times to prevent it from drying out.
- Keep the “Mother” Kombucha mushroom in the fridge.
Banana, Mango & Strawberry Kombucha Smoothie

Prep Time – 10minutes
Total time – 4 days to 4 weeks
You Will Need
- 2 bananas
- 1 mango
- 1 cup strawberries (fresh or frozen) with green tips removed
- 1.5 cups kombucha liquid
- Honey or stevia liquid to taste (optional)
- 1/2 cup of whey
Method:
- Put the fruit and sweetener into the blender and blend on high until all the fruit has been pureed.
- Then add the kombucha and the whey blend until mixed in.
- Enjoy!
Fruit Kvass
You can make kvass from a variety of fruit, berries and vegetables, so try to experiment. I love to make it with cherries (get the pesky stones out though!) stone fruit, apples, pears, halve grapes, dried apricots, figs or prunes. Avoid using fruit that isn’t ripe and I would also avoid melons, bananas, and papaya.
This is a delicious recipe using apple, ginger and raspberries. Just like Kombucha, Kvass has a negligible alcohol content.
Prep Time – 10minutes
Total time – 4 days to 4 weeks
You Will Need
- 2 organic apples,
- 1 teaspoon of grated fresh ginger
- 1/2 a cup of raspberries
- ½ cup of whey
- 1 tablespoon of honey (optional)
Method:
- Decore and slice a whole apple
- Grate ginger root (about a teaspoon full)
- Wash a handful of fresh raspberries (approximately 1/2 a cup)
- Place these all into a 1 litre jar (should fill about a 1/3 of the jar), add ½ cup of whey and top up with water.
- Let it brew for a few days at room temperature, shake 2 or 3 times a day to avoid bacteria forming on the surface. In approximately 24 hours, you’ll see bubbles in the mixture. Every alternate day let open the lid and press the fruit down back into the liquid. It’s ready after 2 to 3 days or when the mixture is vigorously bubbling and the fruit looks “cooked”.
- Taste your brew as often as you wish — it should have a pleasing flavor.
- When it’s ready, strain out and you can discard the fruit solids or reuse to make more Kvass. Typically I find they have lost most of their flavour.
- Serve kvass as is, or keep refrigerated for up to a week. Drink diluted with water. Keep topping up your brew with water until the fruit is spent, then start again.
Probiotic Tomato Juice
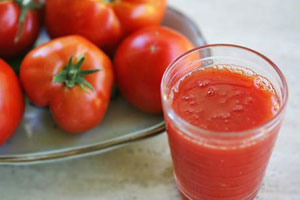
For those of you who love tomato juice here’s an even healthier spin…
Prep Time – 10minutes
Total time – 4 days to 4 weeks
You Will Need:
- 1 cup of whey
- 1 tablespoon of tomato puree
- 1 cup of water
- Salt to taste
Method
- Take 1 cup of whey, 1 tablespoon of tomato puree, 1 cup of water, salt to taste and pulse well in a blender.
. . . . .
Yours in health…
Jennifer Barham-Floreani
Bach. Chiropractic, Bach. App Clinical Science
Registered internationally, no longer practicing as a chiropractor in Australia.
Notes:
*12-14-2013 Updated Kombucha Tea Recipe
